How to Use the Email Editor

The Email Editor is the rich text editor used create and finalize your emails and apply Design Templates, Content Templates, for sending via direct Email Campaigns or automated CRM Journeys. This guide covers every toolbar control, how to apply design and content templates, and how to insert and work with images.

Where the Editor Appears

The same editor is used in three places, each with the same toolbar and image controls: Campaign Editor, Design Template Editor, and the Content Template Editor.

The editor auto-saves when you switch browser tabs. Click Save in the top bar at any time to commit manually.

Editor Bar: Campaign Metadata

The top bar holds the campaign-level metadata fields and the three primary action buttons. These fields are only visible in the campaign editor. The Content Template Editor has its own metadata fields in the settings panel above the body.

Annotated campaign editor top bar and toolbar, with labels 1 through 15
1

Name

The internal Campaign name shown in your campaigns list and analytics, but never sent to recipients. Click to edit inline.

2

Subject

The email subject line — what recipients see in their inbox before opening. Keep it concise and compelling. Supports merge tags (e.g. Hi {{firstName}}, your sale is here).

3

Preheader

The preview text shown after the subject in the inbox (most email clients display 40–140 characters). Use this to complement the subject and improve open rates.

4

Sender Email

Read-only strip showing your configured From name and email address (e.g. Get Shouting <support@yourstore.com>). To change this, go to Email → Sender Settings.

5

Preview / Save / Schedule

Preview — opens a full email preview dialog showing the rendered email in both desktop and mobile views.
Save — manually saves the current state of the campaign as a draft.
Schedule — opens the scheduling dialog to set a future send date and time. Requires at least one recipient list or segment to be selected.

Editor Toolbar

The toolbar sits below the metadata fields and above the email body editing area. Annotations 6–15 correspond to the numbered labels in the screenshot above.

6

Font family

Dropdown to select the font family for the selected text. The available fonts are the Google Fonts loaded by the active Design Template. Choosing a font here affects the selected text in the email body.

7

Text / heading style

Selector for applying a paragraph style to the current block — Normal (body paragraph), H1, H2, or H3. Headings automatically inherit the Brand Color from the active Design Template.

8

Formatting — Bold, Italic, Underline, text color, alignment

Applies inline character styles to selected text: B Bold, I Italic, U Underline. The color chip opens a color picker to set the text color. The four alignment icons set paragraph alignment: left, center, right, or justify.

9

Lists and Indentation

Inserts an unordered (bullet) list or an ordered (numbered) list at the cursor position. The indent and dedent buttons increase or decrease the nesting level of the selected list item or paragraph.

10

M / A / B — Main, Accent, and Background Colors

Three quick-access tools grouped together:
M (Main) — opens the color picker which will affect the Main color theme of your email.
A (Accent) — opens the color picker which will affect the Accent color theme of your email.
B (Background) — opens the color picker which will affect the Background color theme of your email.

11

Emoji, Link, Image, and Mail Merge variables

Emojii Picker — Opens the emoji picker to insert a Unicode emoji at the cursor position. Works in all email clients that support Unicode (most modern clients).
Link — Opens a dialog box for adding a link to the selected text.
Image — Opens the Image Upload dialog box for adding an image to your email. It's important to note that you want to keep your email file size as small as possible, and we set a cap on emails of 1MB. Mail Merge — Allows you to insert a Mail Merge variable into your email. This is a variable that will be replaced with the actual value when the email is sent. For example, if you have a field called "First Name" in your CRM, you can insert {{firstName}} into your email and it will be replaced with the actual first name of the recipient when the email is sent. There is more on Mail Merge Variables below.

12

Button Maker

Allows you to create a styled button in your email. It's best to already have your button text, then select that text and click the Button Maker tool.

13

Design Template Selector

Opens a menu of all of your available Design Templates, including the free and any custom templates you may have created. After applied, these designs can be edited as needed. Pro & Agency plans can create unlimited custom Design Templates.

14

Content Template Selector

Opens a menu of all of your available Content Templates, including the free and any custom templates you may have created. After applied, these designs can be edited as needed. Pro & Agency plans can create unlimited custom Content Templates.

15

AI Generate

Allows you to generate an email from a URL and the prompt you select. Pro & Agency plans can create unlimited custom AI prompts.
Applying a Design Template

A Design Template controls the visual frame around your email — the logo bar, brand colors, fonts, header/footer images, and the CTA button in the footer. Every email uses exactly one. You can switch it at any time without losing your body copy.

In the Campaign editor

  1. Open the campaign editor at Email → Campaigns → Edit, or click on the Campaign name.
  2. In the editor toolbar, click the Design Template dropdown (shows the current template name with a checkmark).
  3. The selector overlay opens showing all available system and custom templates.
  4. Click a template to select it — the logo bar, footer CTA, and all color variables update in the live preview immediately.
  5. If you already have body copy, the editor will automatically re-fit your content into the new template layout.
  6. Click Save to commit your choice.

When creating a new Campaign

  1. Go to Email → Campaigns and click Create Campaign.
  2. On the New Campaign page, the left column shows the Design Template selector.
  3. Click to open the selector overlay and pick a theme. The preview updates immediately.
  4. Save to create the draft with your chosen design.

In a CRM Journey step

  1. Go to Email → CRM Journeys.
  2. Find your Journey card and locate the Design Template dropdown on that card.
  3. Select the theme — this applies to every email that Journey step sends.

In the Content Template Editor

  1. Open any content template at Email → Content Templates → Edit.
  2. Use the Design Template selector overlay in the editor toolbar.
  3. The selected theme wraps the template body in previews so you can see how it will look with different branding — this does not permanently bind the content template to that design.

Design Template vs. Content Template — quick reminder: The Design Template is the look and feel of your email (logo bar, colors, fonts, footer). The Content Template is the text content. They are separate and mix-and-match freely. You can swap either one at any time without affecting the other.

Applying a Content Template

A Content Template is a reusable email body copy — introductions, product sections, CTAs, copy blocks. Applying one pre-fills the body with that layout's subject, preheader, and copy.

Note: Applying a Content Template overwrites the current body copy in the editor. If you have unsaved work you want to keep, save the campaign as a draft before selecting a new template.

In the campaign editor or new campaign wizard

  1. Open the campaign editor or the New Campaign wizard.
  2. In the editor toolbar, click the Content Template dropdown (shows the current template name).
  3. The picker opens showing your custom templates and the system templates marked FREE.
  4. Select a template — the subject, preheader, and body copy are immediately loaded into the editor.
  5. Edit the pre-filled copy as needed, then save.

In a CRM Journey email step

  1. Go to Email → CRM Journeys.
  2. On the journey card, find the Content Template dropdown.
  3. Select the template for that journey's email step. The journey uses the selected template's copy for all emails it sends.

Creating a new Content Template

If you want to save your current copy as a reusable template for future campaigns:

  1. Go to Email → Content Templates and click Create Content Template.
  2. Write or paste your copy in the body editor.
  3. Set a Name, optional Description, Category, Default Subject, and Default Preheader in the metadata panel.
  4. Click Save — the template is immediately available in all campaign and journey content template pickers.

See Email content templates for a full guide including system template descriptions.

Working with Images

Images can be inserted at any position in the email body. After inserting, hover (desktop) or click (mobile) any image to reveal the image controls overlay.

Inserting an Image

  1. Place your cursor where you want the image to appear in the body.
  2. Click the Image button (annotation 13) in the toolbar.
  3. Your media library opens — browse and select an image, or upload a new one.
  4. The image is inserted inline at the cursor position.

Image Controls

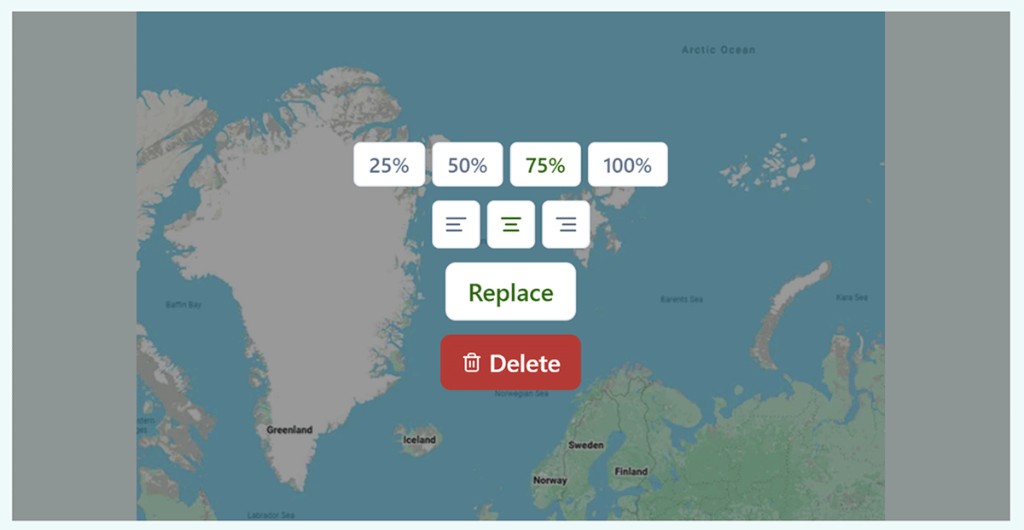
Click or hover over any image in the editor body to reveal the image controls overlay. The controls float above the image.

Email editor image controls showing size presets 25%, 50%, 75%, 100%, alignment icons, Replace button, and Delete button
Control What it does
25% / 50% / 75% / 100% Sets the image width as a percentage of the email body container width. 100% is full-width (recommended for hero images). 50% is useful for side-by-side product shots. The currently active size is highlighted.
Alignment icons (left / center / right) Aligns the image within the column. Left — image sits at the left margin. Center — image is horizontally centered (most common). Right — image sits at the right margin. For full-width (100%) images, alignment has no visible effect.
Replace Opens the media library to swap the current image for a different one. The new image keeps the same size and alignment settings as the replaced image.
Delete Removes the image from the email body. This action cannot be undone — use with care on campaigns that have no other copy saved externally.

Image best practices: Use full https:// URLs when writing custom HTML — relative paths do not work in sent emails. For images inserted via the toolbar, URLs are handled automatically. Use 100% width for hero images and 50% or less for product thumbnails alongside text.

Merge Tags (Personalization)

Merge tags are placeholders that the system replaces with the appropriate, personalized data when the campaign is sent. Insert them via the {+} button (annotation 11) in the toolbar, or type them directly in the body.

Tag Replaced with
{{firstName}} Contact's first name
{{lastName}} Contact's last name
{{email}} Contact's email address
{{brandName}} Your brand name
{{customProperty.KEY}} Custom property value from the contact record (replace KEY with your property name)

Merge tags also work in the Subject and Preheader fields. If a tag has no value for a given contact (e.g. no first name), it renders as an empty string. Remember to write copy that reads naturally with or without the value.

HTML Source Mode

Click the <HTML> button to toggle between rich text view and raw HTML source view. In source mode you can paste, write, or edit HTML directly for custom product grids, side-by-side columns, or any layout the rich text controls cannot produce.

How it works: Your HTML goes into the body content area — the region between the Design Template's header bar and the footer CTA. You are not writing a full HTML document. The Design Template supplies the outer HTML shell, head, header, footer, and all CSS. You only write the inner content.

Allowed HTML Tags

We sanitize all email body HTML for security and cross-client compatibility. Only these tags are preserved on save — everything else is stripped:

p   br   strong   b   em   i   u   ul   ol   li
a   span   div   h1   h2   h3
img   table   tbody   thead   tfoot   tr   td   th   hr

Always removed: <style>, <script>, <head>, <body>, <iframe>, event handlers (onclick, etc.), and javascript: links. Move all styles to inline style="" attributes.

Images in Custom HTML

Every <img> tag needs these inline styles or it will break in Outlook and resize incorrectly on mobile:

<img
  src="https://yourdomain.com/image.jpg"
  alt="Description of the image"
  style="max-width:100%;height:auto;display:block;border:0;outline:none;text-decoration:none;"
/>

Multi-column Layout

CSS flexbox and grid are not supported by Outlook or many mobile clients. Use role="presentation" tables for columns:

<table role="presentation" cellpadding="0" cellspacing="0" border="0" width="100%">
  <tr>
    <td class="stack" style="width:50%;vertical-align:top;padding-right:8px;">
      <p>Left column content</p>
    </td>
    <td class="stack" style="width:50%;vertical-align:top;padding-left:8px;">
      <p>Right column content</p>
    </td>
  </tr>
</table>

Adding class="stack" to <td> elements makes columns collapse to full-width on mobile screens (≤ 600 px).

How Brand Colors Flow into Custom HTML

When we render an email, it injects your Design Template's color settings as CSS custom properties. Any HTML in the email body can reference these variables so colors update automatically when you switch Design Templates.

CSS Variable Set From Used For
--main-color Brand Color setting Headings (H1–H3), logo bar, border accents
--accent-color CTA Button Color setting CTA button fill, colored callout blocks
--background-color Email Background setting Canvas behind the email container; card backgrounds
--text-color Fixed at #333333 Default body paragraph text — not editable per Template

Always Include a Hex Fallback

Some email clients (Gmail Android, older Outlook) strip the <style> block and CSS variables stop working. Always write the hex value first, then the CSS variable as a progressive enhancement:

<!-- Correct: hex fallback first, then CSS var -->
<p style="color:#009933; color:var(--main-color);">Brand text</p>
<div style="background:#1A1A1A; background:var(--accent-color); padding:20px;">
  CTA block
</div>

<!-- Wrong: CSS var only — invisible in Gmail Android -->
<p style="color:var(--main-color);">This may be invisible</p>

Replace the hex fallback values with the colors from your current Design Template so the email looks correct even in clients that cannot read CSS variables.

Design Template vs. Content Template

Think of a Design Template as the look and feel of your email and a Content Template as the body copy inside it. They are separate and mix-and-match freely.

Design Template Content Template
Controls Logo bar, brand colors, fonts, header & footer images, CTA button Body copy, text layout, images, multi-column sections
Found at Email → Design Templates Email → Content Templates

Design Template Settings Reference

Open any Design Template at Email → Design Templates → Edit. The left panel holds all settings; the right panel shows a live preview that updates in real-time.

Setting What it Controls
Display Name Internal label shown in the Design Picker. Not visible to email recipients.
Brand Color Primary hex color. Applied to the logo bar, headings (H1–H3), and border accents. Becomes the --main-color CSS variable in the email.
Logo Brand logo image shown in the header bar. Upload from your media library. PNG or SVG with a transparent background works best.
Logo Alignment Left / Center / Right position of the logo inside the header bar.
Logo Bar Color Background color of the header bar. Defaults to the Brand Color if left blank.
Header Image Optional full-width image displayed behind the logo in the header bar. Recommended minimum 1200 × 300 px. Keep key artwork centered — the image is cropped to bar height.
Footer Image Optional full-width image displayed behind the CTA button in the footer bar.
Header Font Google Font for headings (H1, H2, H3). Falls back to system sans-serif if the client does not support web fonts.
Body Font Google Font for body text. Inherits the header font if not set separately.
CTA Preset Predefined call-to-action label (SHOP NOW, LEARN MORE, EXPLORE, ORDER NOW, etc.). Set to None to hide the CTA button entirely.
CTA Bar Color Background color of the footer bar surrounding the CTA button.
CTA Button Color Solid fill color for the CTA button. Also sets the --accent-color CSS variable used in the body.
CTA Text Color Label color on the CTA button. Should contrast well with the CTA Button Color.
Email Background Background color of the canvas behind the email container. Becomes --background-color.

Creating a Custom Design Template

Pro or Agency plan required

Creating and editing custom Design Templates is available on the Pro and Agency plans. All plans can use the system gallery templates. See pricing →

  1. Go to Email → Design Templates (/email/themes).
  2. Click Create Design Template to start from a blank canvas, or click the menu on any existing template and choose Duplicate.
  3. The editor opens: settings panel on the left, live preview on the right.
  4. Configure your Display Name, Brand Color, Logo, Logo Bar Color, Header/Footer images, Fonts, CTA settings, and Email Background.
  5. Click Save — the template is immediately available in all campaign and journey design selectors.

For a detailed walkthrough of every setting, see the Email Design Templates how-to guide.

Troubleshooting

Issue Solution
Custom HTML color looks wrong in some email clients Add a hex fallback before the CSS variable: color:#009933; color:var(--main-color);
Images not showing in sent email Use full https:// URLs. Relative and local file paths do not work in sent emails.
Two-column layout breaks on mobile Use role="presentation" tables with class="stack" on each <td> to stack columns on mobile.
My <style> block was removed <style> tags inside email body copy are stripped. Move all styles to inline style="" attributes.
Image controls not showing when I click an image Make sure you are in rich text view (not HTML source mode). Click the </> button to switch back to rich text, then click the image.
Design Template not updating after I change it Refresh the campaign editor. If the issue persists, the updated template may take a moment to propagate — wait a few seconds and reload.
Content Template dropdown is empty No content templates have been created yet. Go to Email → Content Templates → Create Content Template to add one, or use a system template.
Logo bar color not matching brand Open the Design Template editor and check the Logo Bar Color setting. If blank, it inherits the Brand Color.
CTA button not showing in email footer Check the CTA Preset setting in the Design Template — if set to None, the button is hidden. Pick a preset (SHOP NOW, etc.) to show it.
Create Design Template button missing Creating custom templates requires a Pro or Agency plan. See pricing to upgrade.
Cannot delete a Design Template Remove the template from all active campaigns and journeys first, then delete.

Next Steps