How to Set Up Your Personalized Email Sender & DNS
When you send email campaigns, appearing as coming from your own Brand domain builds trust and improves deliverability. We make it as easy as possible to set up your custom email in 3 steps.
Why set up a custom sending domain?
Until you verify a custom domain, your emails send from campaigns@getshouting.app. That works, but setting up your own domain provides several advantages:
- Deliverability — SPF and DKIM records prove to inbox providers that your mail is legitimate, reducing spam placement.
- Brand trust — Recipients see your domain in the From address instead of a shared platform address.
- Click tracking — A tracking CNAME record enables accurate click-through attribution on your campaigns.
Sender Identity & Reply-To
Open Account → Brand Settings → Email Sending.
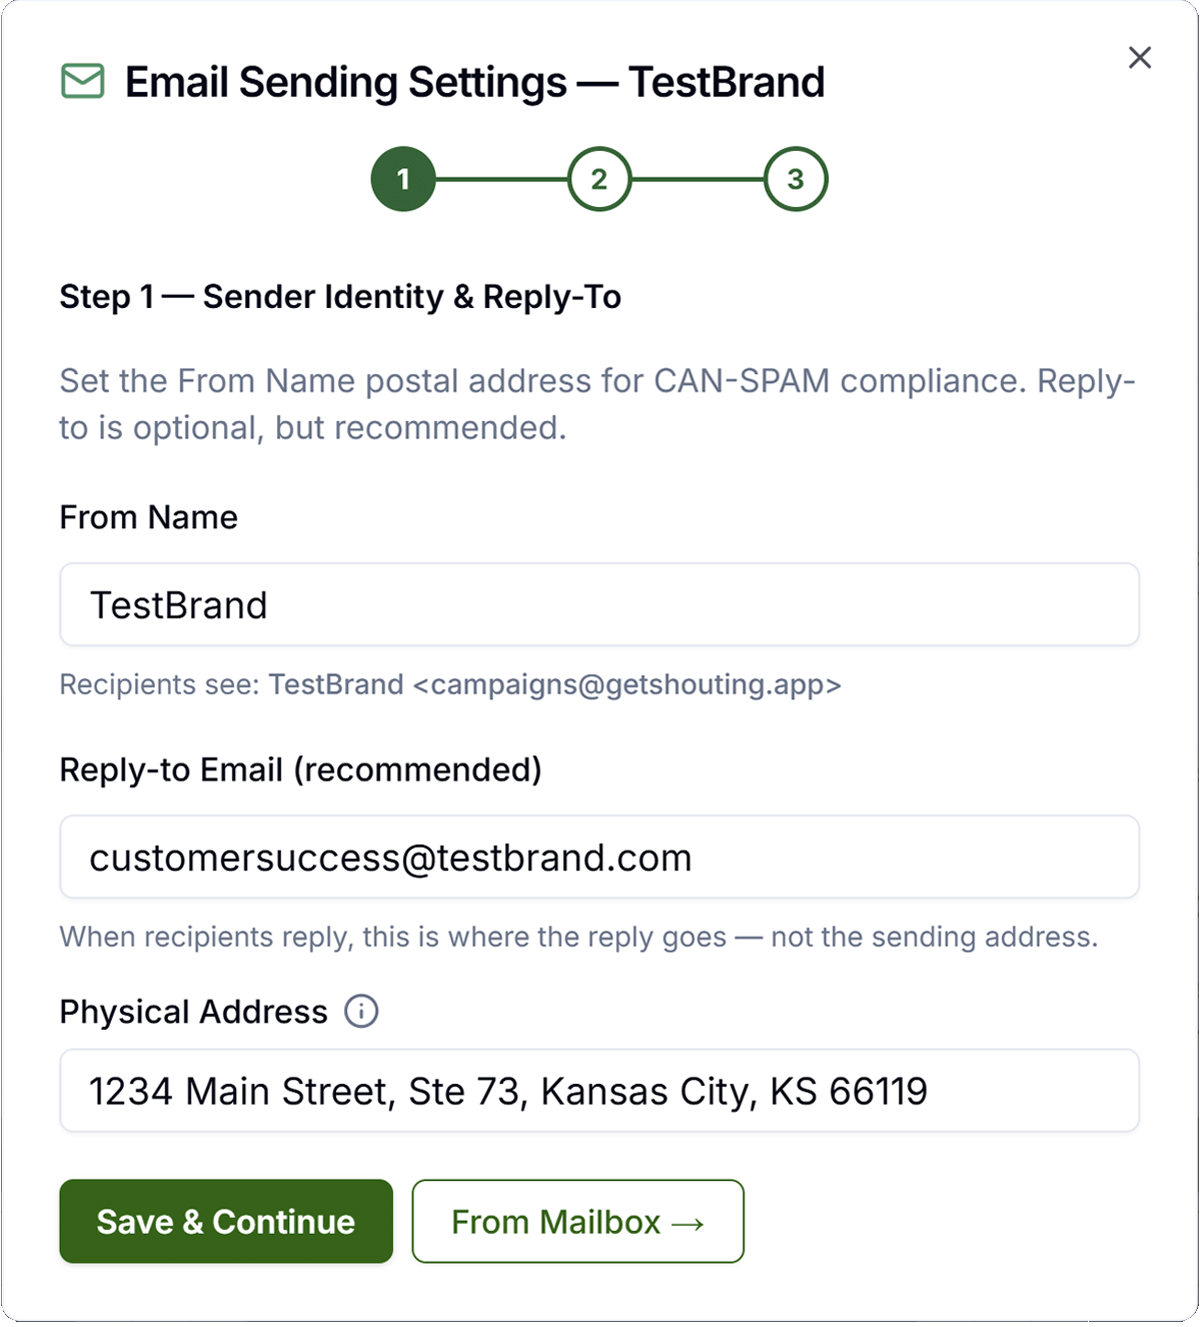
Save with Save & Continue (use From Mailbox → when you’ve already saved and want to continue without submitting again).
- From Name — Display name in the inbox preview line.
- Reply-to Email — Where replies route; independent of sending domain.
- Physical Address — CAN-SPAM / CASL postal line in footer.
Until the physical address is saved, steps 2 and 3 remain disabled.
Sending Email Address
Enter the email address you want your emails to come from; e.g. hello@yourbrand.com. Only use a domain you control. The next step requires you add some entries on your hosting service.
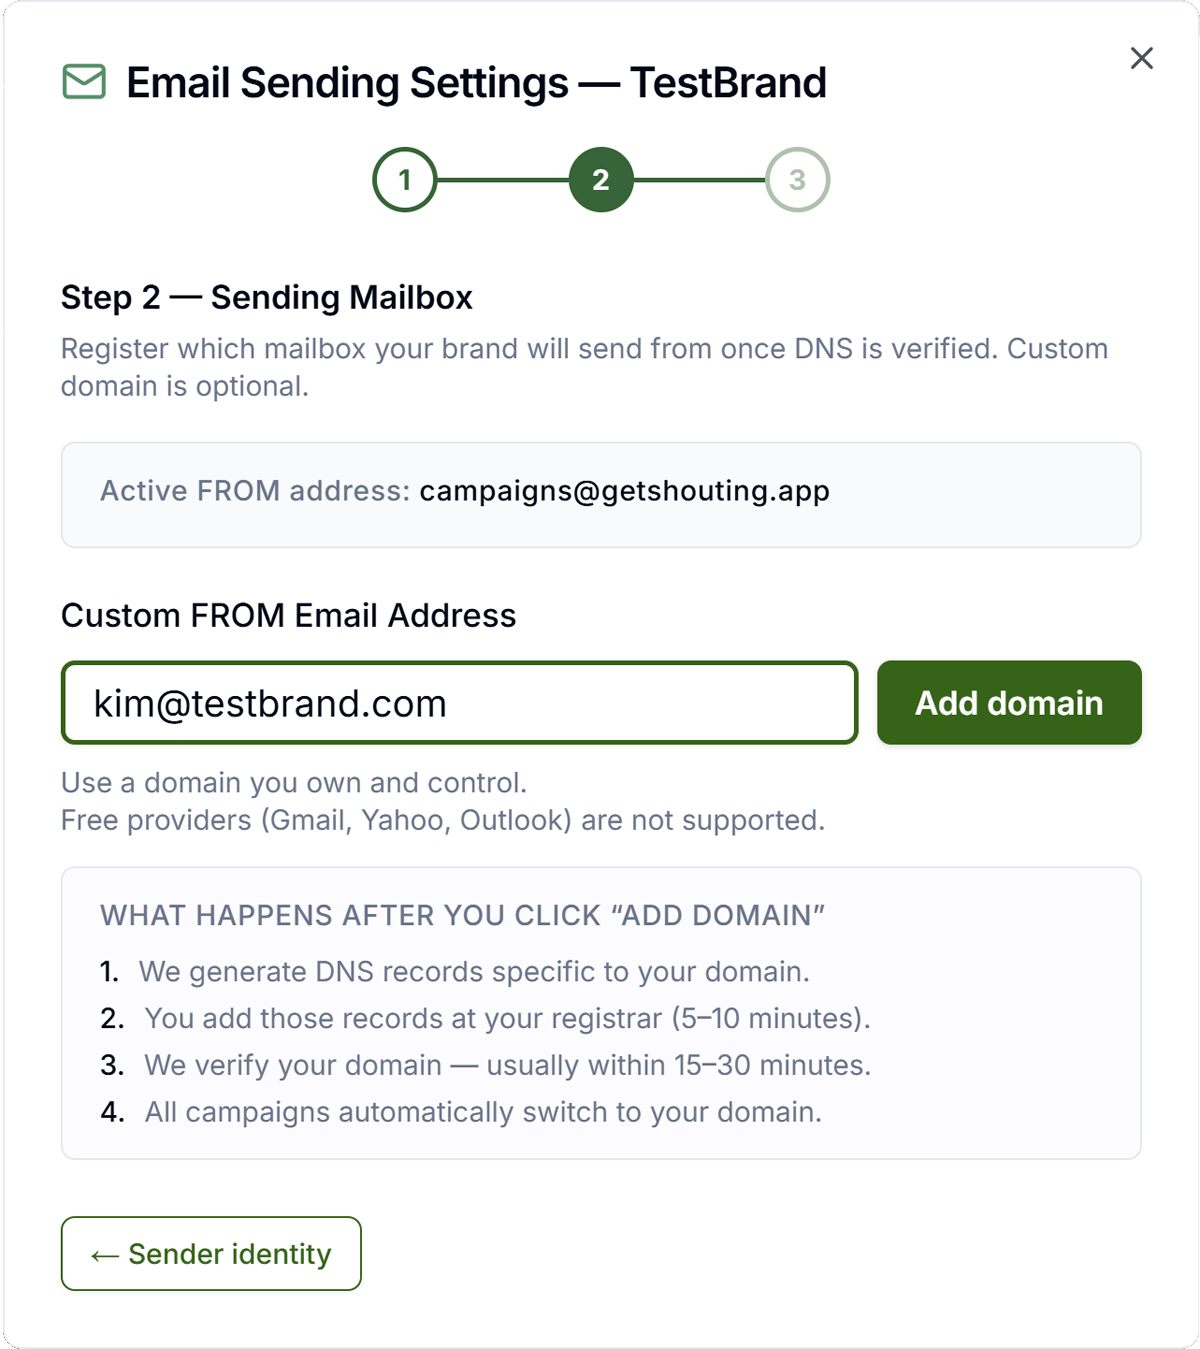
Add domain registers DNS with our provider and jumps you straight to circle 3 for verification. Navigate back anytime with circle 2 or ← Mailbox from Step 3.
DNS Records & Verification
This is both the registrar checklist and verification. Each DNS record is created specifically for your domain and is unique to your Brand.
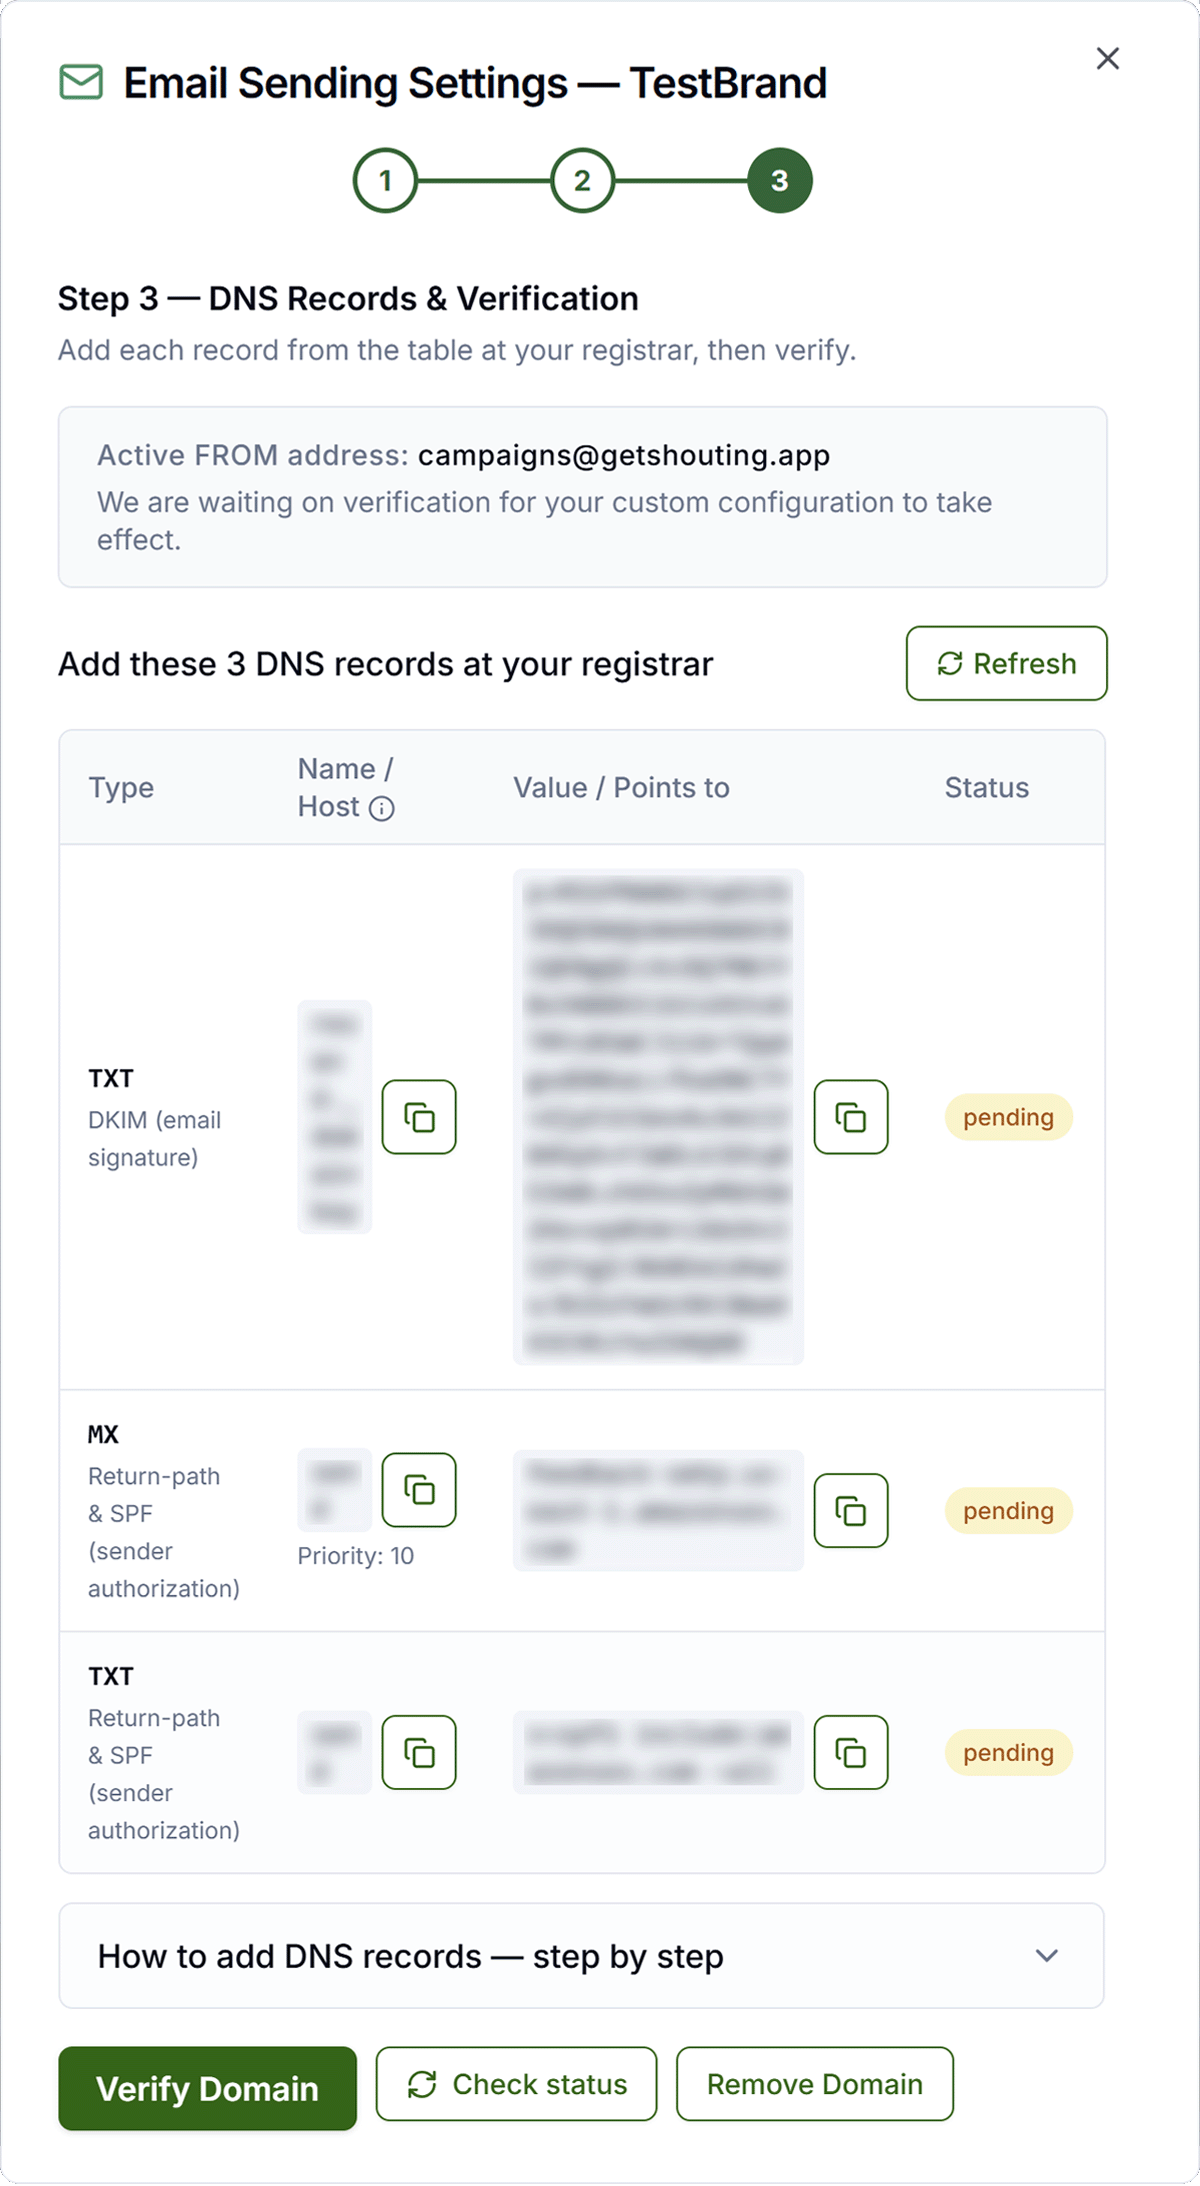
Add each record at your registrar
Log in wherever you host your site or manage DNS settings. If you're unsure, search your email for your domain purchase confirmation. We've added helpful links below.
It is very important that you copy and paste the exact values from the table into your registrar including the TYPE, NAME, and VALUE.
Go directly to your registrar's DNS settings
Not listed? Search your email for “domain registration” or “DNS settings” to find your provider.
- Open DNS settings for your zone — sections may be labelled DNS, DNS Management, DNS Records, or Advanced DNS.
- For each row from the Get Shouting table: pick Type (MX, TXT, CNAME…), paste Name / Host and Value. Leave TTL as Auto or 3600.
-
Important — Name / Host: enter only the prefix (e.g.
send,links,abc123._domainkey). Never paste.yourdomain.com— registrars append the zone automatically. - Back in Step 3, click Verify Domain to ask Resend to rescan immediately, then use Check status any time you just need the freshest snapshot displayed. Remove Domain appears on Step 3 to the right of Check status whenever you might need to unregister.
Registrar-specific tips
- Cloudflare: When adding CNAME records, make sure the proxy toggle is set to DNS only (gray cloud icon, not orange). Proxied CNAMEs break DKIM.
- GoDaddy: Go to DNS > Add New Record. The “Host” field is the Name column. Do not add your domain to the end.
- Namecheap: Go to Advanced DNS on your domain. Use “Add New Record”. For CNAME values that end in a period (
.), you can omit the trailing period. - Google Domains / Squarespace: Go to DNS > Manage custom records. Add each record type individually.
- AWS Route 53: In your hosted zone, create each record. For CNAME values ending in a period, include it.
Verify & read status
DNS propagation can take a few minutes to 48 hours worldwide — most registrars converge in 15–30 minutes. While you wait:
- Use Verify Domain right after publishing records to force another scan.
- Use Check status any time just to reload the newest known state.
- Remove Domain also lives on Step 3 for quick teardown next to primary actions.
| Status shown in app | What it means | Action |
|---|---|---|
| Not started | No domain registered yet | Enter mailbox address and click Add domain |
| Pending | DNS records not yet detected | Wait and use Check status to re-poll |
| Verified | All records confirmed; sending is enabled | No action needed — campaigns will send from your address |
| Failed | One or more records are wrong or missing | Fix records at registrar, Verify Domain again, Check status |
- Double-check every Type, Name, and Value copied from Step 3.
- On Cloudflare, keep DKIM-related CNAMEs on DNS only (grey cloud).
- If MX host conflicts arise, confirm your registrar permits multiple MX entries with differing priorities.