How to Create, Download, and Publish an Ad & Variants
Create an Ad and optional Variants with customizable text overlays, bar layouts, logos, and CTAs. Generate four AI-powered creative variants (five ads including Prime), download a ZIP of ad-ready assets for each platform and dimension, and/or schedule directly to your connected social accounts.
After selecting "Create Ad" from the Create page, selecting "Create Ad" from your store, or selecting an Ad from the Ads page, you'll land on the Ad Preview page. This is where you finalize your Ad and assets before scheduling or downloading your Ad assets.
Review Your Ad & Create Variants
The Preview page is where you finalize your Shout before scheduling or publishing. This is Step 2 of 3 in the Create an Ad process.
After you're happy with your Ad, you can Create Variants. Variants are independent Ads and can have different fonts, bar colors, text positions, and copy angles. When you click "Create Variants", we generate 4 additional variations (for a total of 5) based on your original Ad or product inventory. Your original Ad stays available as V1, resulting in 5 ads total. Each Variant is a separate can be edited, downloaded, and scheduled independently.
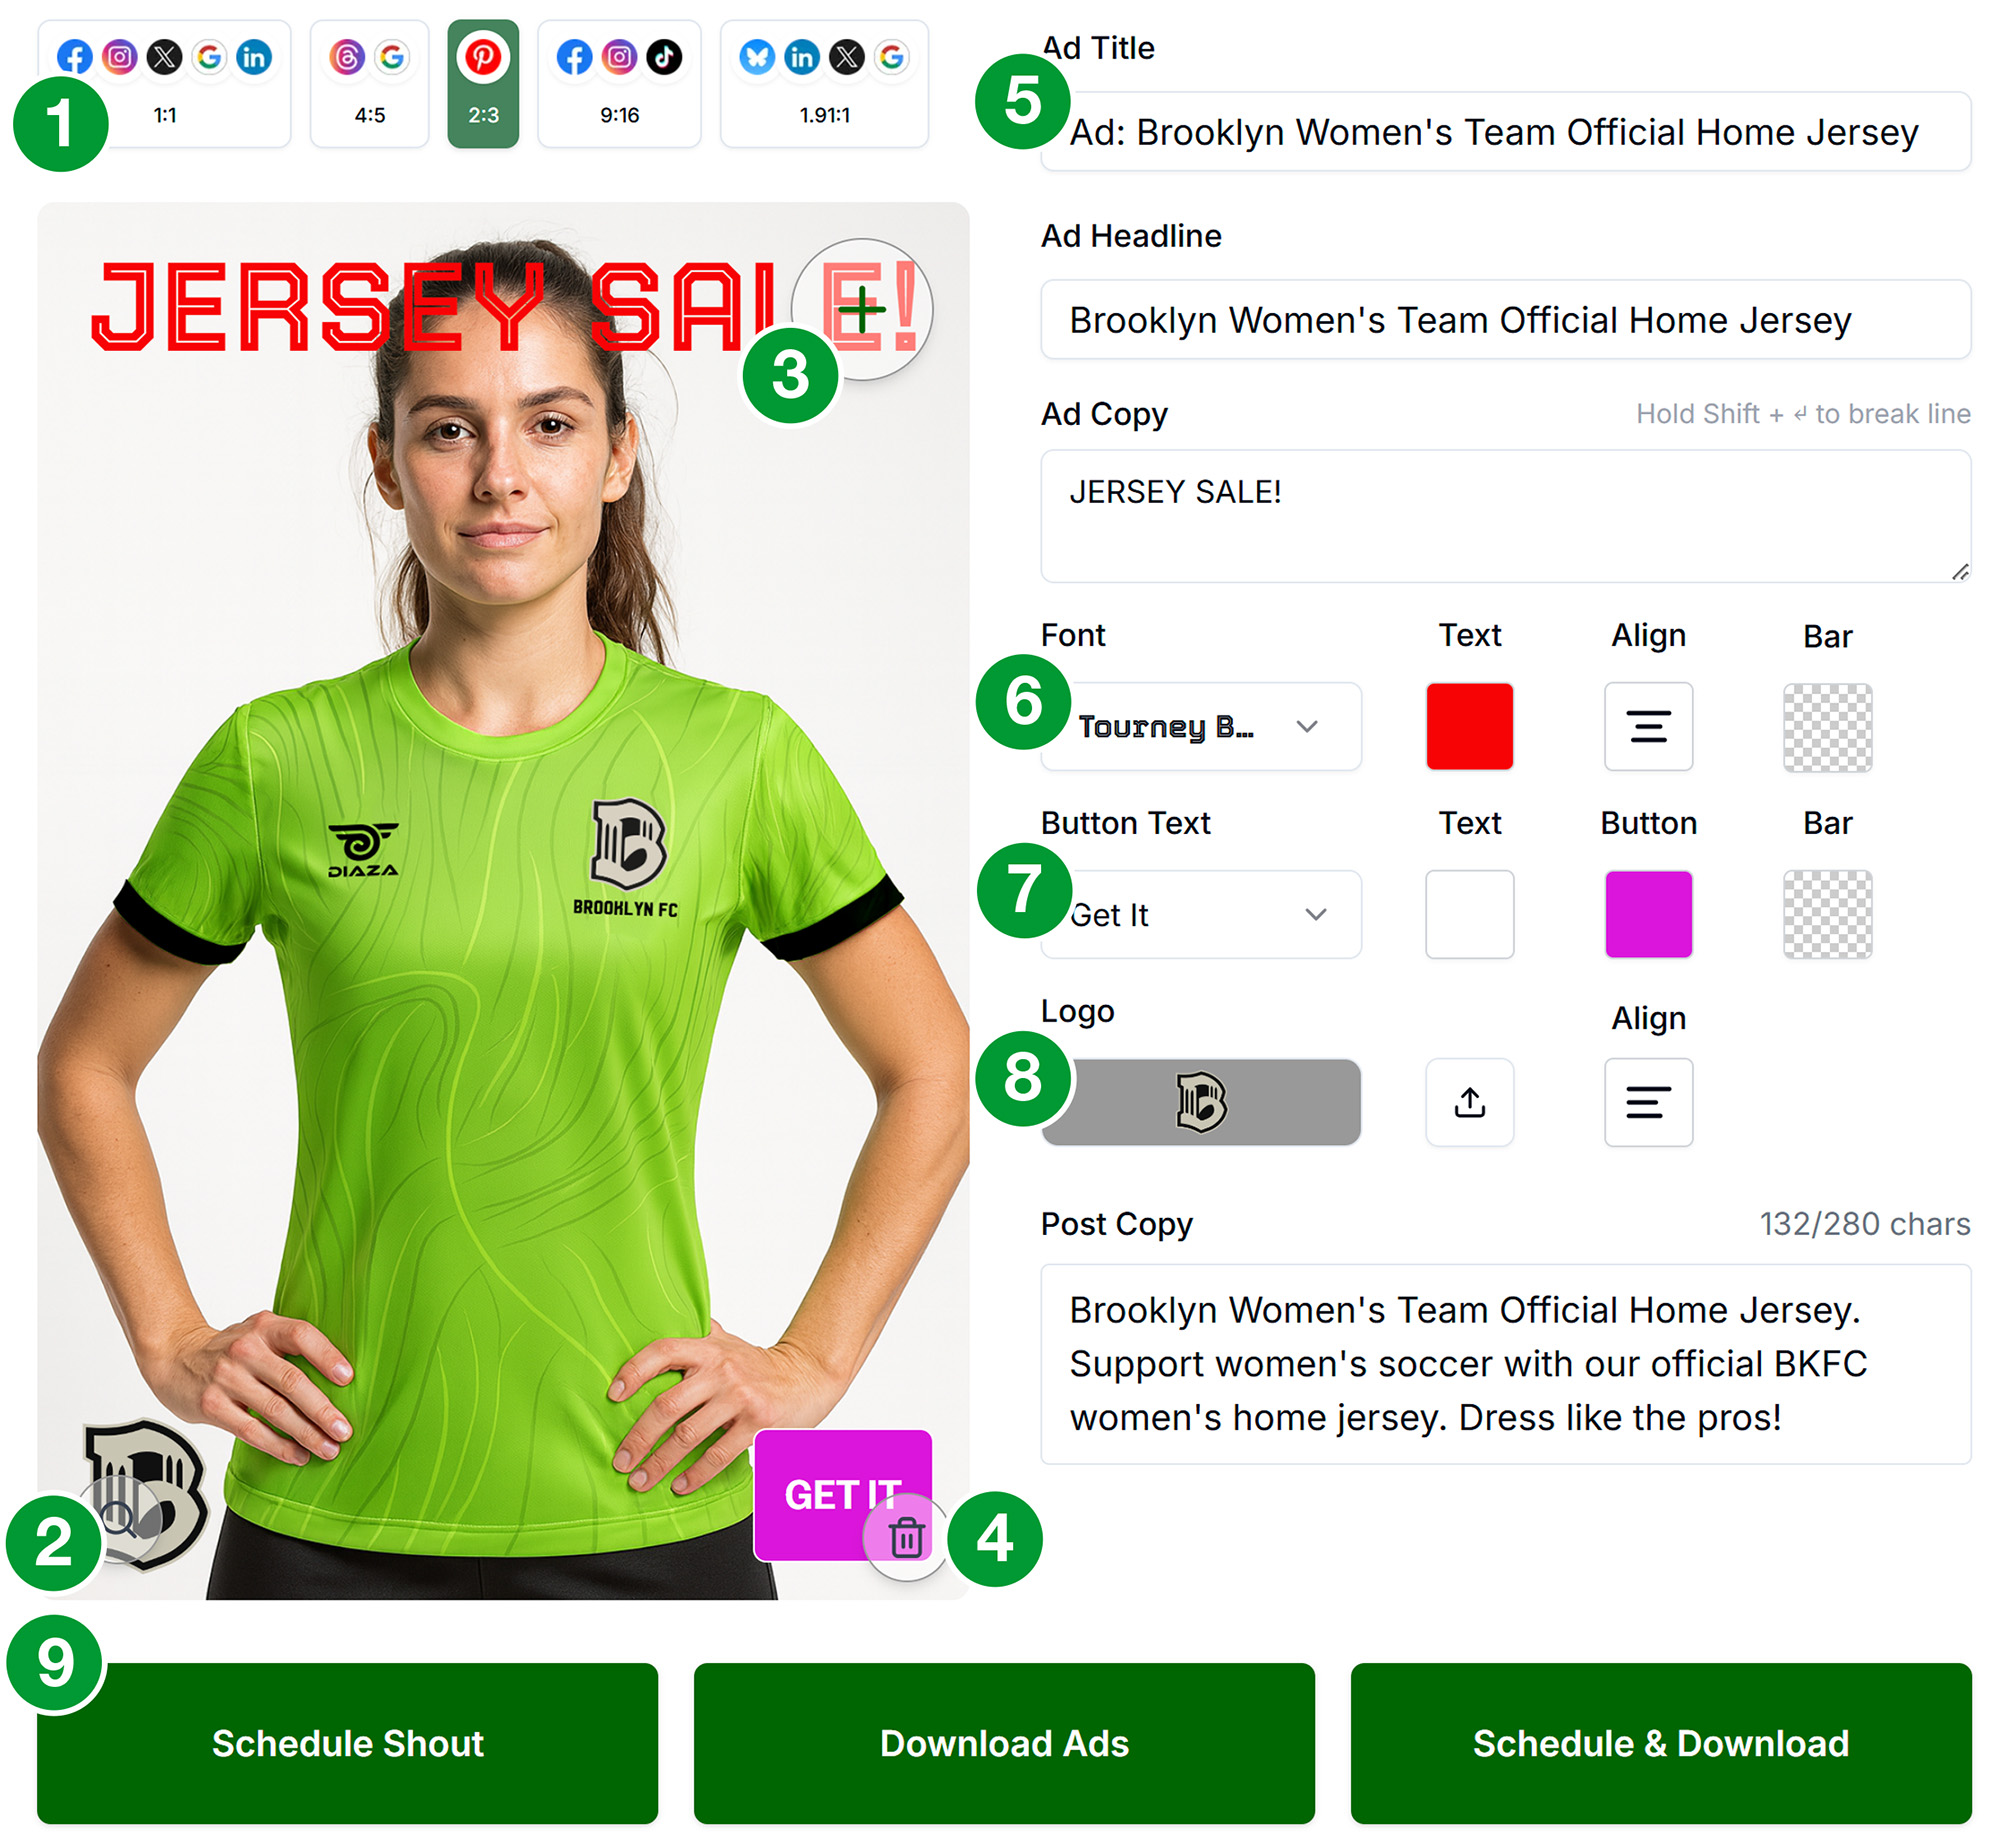
The Interface
- Variant Switcher If you have used Create Variants, tabs appear above the Asset Preview: Prime (your original Ad) and V1 through V5 (four AI-generated variants). Each variant is an independent Ad with its own copy, fonts, colors, and layout, but they all share the same source image and post headline. Switch between each variant and edit it as you see fit. Edits apply only to the variant you are viewing.
- Aspect Ratio Switcher Social platforms are organized by aspect ratio. Click the different aspect ratio buttons to see how your Ad looks at each size. Check the zoom and cropping for each aspect ratio before downloading or scheduling. We call this view window the Asset Preview.
- Preview The Preview window shows you how your Ad looks at each aspect ratio. You can edit the zoom and cropping for each aspect ratio to ensure you are publishing what you want. The controls are the same as in the Shout Preview page.
- Zoom Zoom in/out on your image. Drag the image to reposition or crop.
- + The "+" icon adds assets. Upload new images or select from your Asset Library. To change your main Ad image, delete the current one and upload a new one. You only need one image per Ad.
- Trash Deletes the asset from your Ad.
- Ad Title: Internal name that is only shown on the Ads page. Variants are named "V1" through "V5".
- Ad Headline: Published as post title on some platforms. Not an image overlay.
- Ad Copy (Text 1): The text overlay — e.g. "Limited Stock: Act Fast!". Dynamically sized: fewer characters = larger text. Keep it to 3 lines or fewer for best results.
- Text Color is set with the button with the "A" icon.
- Text Alignment is set with the 3 line Align button.
- Text Position is set with the button with 4 squares. Position options are divided into 9 sectors.
- You can mix and match Align and Position options to your liking, but we recommend that if you want centered text you center both Align AND Position.
- Ad Copy 2 (Text 2): An optional second text overlay, independently positioned and styled. Great for a sub-headline or supporting message on a different part of the image. Click the bracket to expand and edit.
- CTA Button Choose the CTA label ("Shop Now", "Learn More", etc.), CTA text color, button background color, and position. You may also set an independent bottom bar background color. The CTA button is a visual element only — it is not a clickable link in the exported image.
- Logo Upload and position your logo. You may have one logo; upload a new file to replace the current one.
- Bar Colors (T / M / B) Set Bar colors for the Top, Middle, and Bottom rows. Each bar will span the full width of your Ad. Leave the bar transparent if you don't want one.
- Post Copy: The social caption that appears if you publish the ad to your connected social networks. Each Variant is unique, so you must publish each Variant separately. Target 150–300 characters.
- Create Variants Generates 4 variations (for a total of 5) of your Ad (different fonts, bar colors, text positions, copy angles) as unique, linked Ads named V1-V5. Any edits you make to a variant apply only to that variant. Switch between them in the Variant Tab Bar above the Preview.
- Download Assets Creates and downloads assets for every aspect ratio and social platform in the correct dimensions. If you created Variants, all variant assets are included plus a CSV of copy variants. Files are organized by variant (
v1_ShoutName/,v2_ShoutName/, …) and includead_copy_all_variants.csv. Everything is delivered in a single ZIP file. - Schedule Shout Schedules your Ad to connected social accounts. Each variant is a unique Ad, so schedule each one separately. You will go to the Schedule Selector to pick platforms and timing.
Step 1: Create an Ad Shout
Option A: From Create Page
- Click +Create in the main navigation
- Enter an Ad name (or use auto-generated)
- Click "Create Ad"
Option B: From Store (Product-Based Ad)
- Go to My Store
- Find a product
- Click "Generate Shout" or "Create Ad" if available
- If taken to regular Preview, switch to Ad mode if there is a toggle
Option C: From My Ads
- Go to My Ads
- Select an existing Ad to reopen it on the Ad Preview page
- Continue editing, create Variants, download assets, or schedule
Step 2: Add Assets & Configure Your Ad
- Add an image: Upload, Library, or Store. To replace your image, delete the current one and add a new one.
- Adjust: Zoom and position your main image for each aspect ratio.
- Ad Title: Internal name for the Ad (shown in My Ads only).
- Ad Headline: Published as post title on some platforms. Not shown as an overlay.
- Ad Copy (Text 1): Primary image overlay — e.g. "Summer Sale 50% Off". Dynamically sized: fewer characters = larger text. Use Shift+Enter for line breaks. Keep to 3 lines or fewer.
- Ad Copy 2 (Text 2): Optional second overlay — independently positioned and styled. Great for a sub-headline on a different row.
- Text position: Place each overlay in any of 9 grid positions (3×3 grid). Text 1 and Text 2 are always in different rows.
- Font & weight, text color, alignment: Independent settings for Text 1 and Text 2.
- Bar colors (T / M / B): Top, Middle, and Bottom row background colors. Transparent = no bar.
- CTA: Choose label ("Shop Now", "Learn More", etc.), text color, and button color. The CTA button is a visual element only — not a clickable link in the exported image.
- Logo: Upload or select from your Library. Choose grid position. To replace, just upload a new logo.
- Dimension check: Review all aspect ratios before downloading or scheduling.
Step 3: Create Variants (optional)
Click "Create Variants" in the footer. The AI generates 4 creative variations of your Ad — each with a different font, bar color scheme, text position, and copy angle. Variants are created as independent Shouts linked to your original (the "Prime") — five ads total.
After generation, a Variant Tab Bar appears above the preview: V1, V2, V3, V4, V5. Click any tab to switch to that variant and customize it further. Each variant can be individually scheduled or downloaded.
When you Download Assets, all variants are included in the ZIP, organized in separate folders (AdTitale_v1, AdTitale_v2, …) alongside a ad_copy_all_variants.csv that lists all variants and their copy for easy reference when setting up paid ad campaigns.
Step 4: Download Assets or Schedule
A. Download Assets
- Click "Download Assets"
- The system composites ad images for all selected platforms and dimensions
- Your browser downloads a ZIP file with images organized by variant folder
- A
ad_copy_all_variants.csvis included for easy campaign setup - Upload to Meta Ads Manager, TikTok Ads, Pinterest Ads, LinkedIn Campaign Manager, etc.
B. Schedule Shout
Click "Schedule Shout". The system prepares your Ad for publishing and takes you to the Schedule Selector page where you choose platforms and date/time.
You can also download assets and schedule separately — there is no combined "Schedule & Download" button. Use both independently as needed.
Troubleshooting
"Create Ad" or ad mode not visible
Ad features may require a PRO+ or higher plan. Check Account → Billing.
"Download Assets" creates empty or failed ZIP
- Ensure at least one image asset is in the Ad
- Ensure at least one platform/dimension is selected
- Try making a small edit and saving before downloading
Downloaded text looks different from the preview
- Save your Ad before downloading — unsaved metadata will not be used
- Verify the correct aspect ratio is selected when previewing; each ratio may have different crops
- Font rendering in the exported image uses the same sizing logic as the preview; if text appears smaller, try reducing the character count or line count
Assets look wrong (text cut off, wrong colors)
- Check that ad metadata is saved before downloading
- Check each aspect ratio individually — some layouts may need adjustment per ratio
"Create Variants" button not visible
- Variant generation requires a PRO+ or higher plan
- The Ad must be saved before variants can be generated
Schedule Shout fails
Verify social accounts connected, at least one asset and one platform selected.