How to Use the CRM
Visual Journey Builder
The CRM Visual Journey Builder is a node-based flow editor that lets you build CRM automations by connecting steps like send email, send SMS, wait, etc. in a live sequence that runs automatically for every enrolled contact.
Where the Journey Builder lives
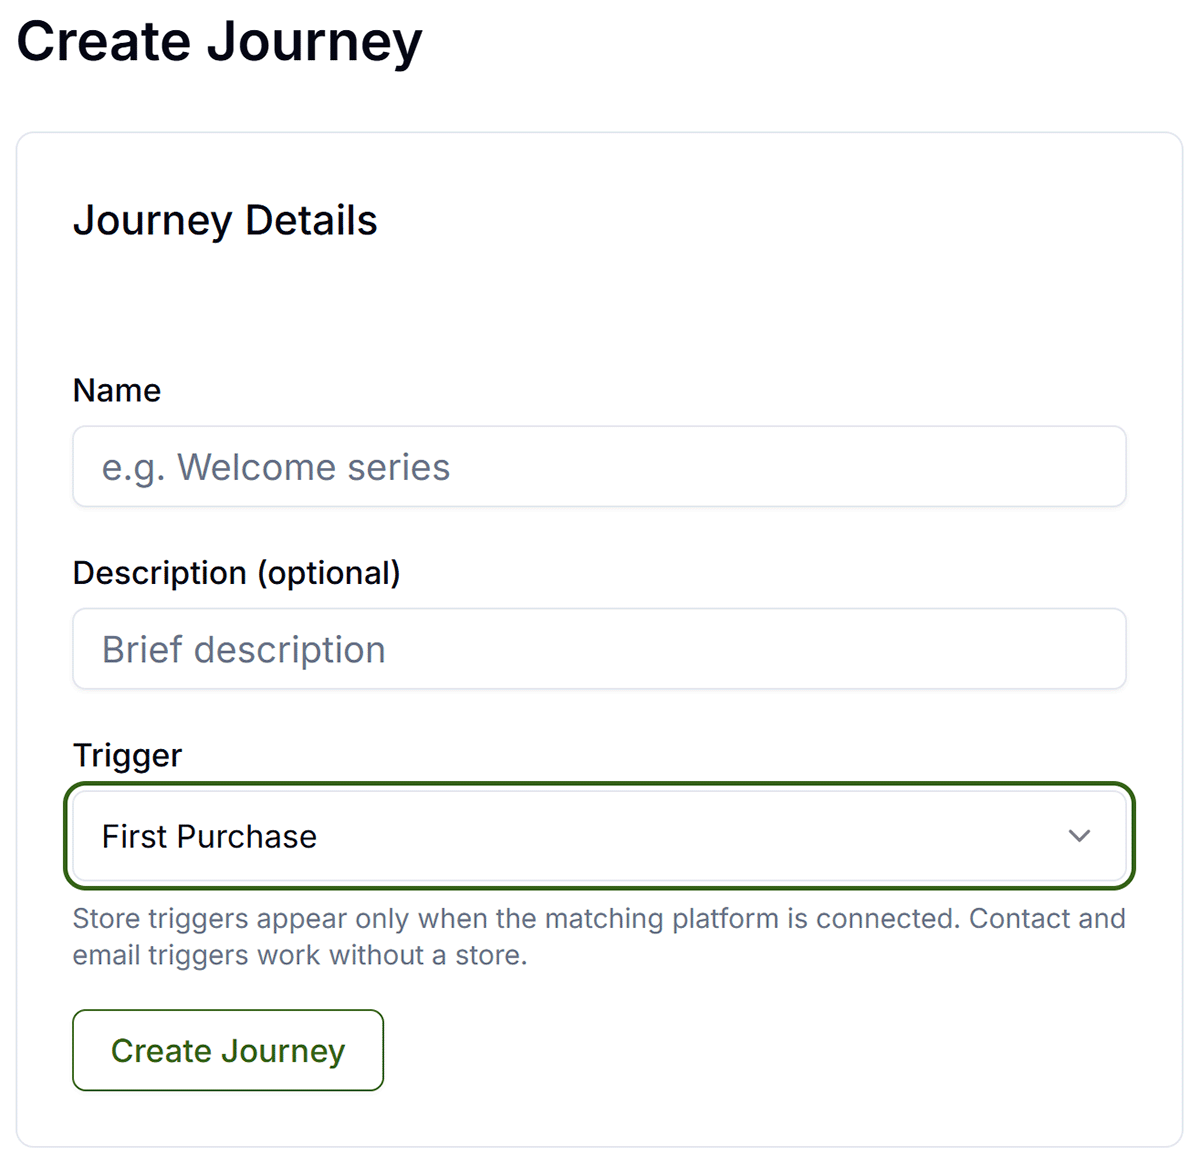
Each Journey has its own canvas. To open it, go to Email → CRM Journeys. The Visual Journey Builder opens if you are on a Pro or Agency plan and click the Journey name or Create Journey button.
The Trigger node
Every Journey begins with a single Trigger node at the top. The trigger is set when the Journey is created and cannot be changed afterward. It defines the event that causes a contact to enter the Journey automatically.
You will only see the triggers that are available to you based on your plan and the store you are connected to. If you are not connected to a store, you will only see Email Journeys. If you are connected to a Shopify store, you will not see the WooCommerce triggers and vice versa.
| Trigger | When it fires |
|---|---|
| Contact Added to List | No store needed. Fires when a new Contact subscribes via a web form and is added to your Subscribers list. |
| Tag Added | No store needed. Fires once for each tag that is newly added to a Contact. A Tag the Contact already has does not re-fire. Tags can be added via the Add Tag step inside a Journey. |
| Email Opened | No store needed. Fires the first time a Contact opens a specific email you sent. |
| Email Clicked | No store needed. Fires the first time a Contact clicks any link in a specific email you sent. The clicked URL is passed as metadata and can be referenced in subsequent Journey steps. |
| Order Placed | Shopify or WooCommerce. A single cross-platform trigger for "payment confirmed." On Shopify, fires via orders/create and orders/updated. On WooCommerce, fires once when the order first reaches processing or completed, deduplicated per order. |
| Order Fulfilled | Shopify or WooCommerce. Fires when an order ships. On Shopify: fulfillments/create. On WooCommerce: order status becomes completed. |
| First Purchase | Shopify only. Fires when a paid order is confirmed as the customer's very first. |
| Abandoned Cart | Shopify only. Fires when a checkout is started but no order is placed. Deduplicated per checkout session. A built-in 45-minute Wait step is added before the first email. |
| New Customer Created | WooCommerce only. Fires when a new customer account is created in your WooCommerce store. |
| New Order | WooCommerce only. Fires immediately when the order is created. Payment may not yet be confirmed at this point; the order could still be pending. Use for instant acknowledgement flows, not post-payment flows. |
| Order Updated | WooCommerce only. Fires on every change to a WooCommerce order: status changes, tracking added, notes, etc. Use for broad order-monitoring Journeys. |
| Order Processing | WooCommerce only. Fires once when the order status transitions to Processing; payment confirmed and order queued for fulfillment. This is the recommended post-payment trigger for WooCommerce stores selling physical goods. |
| Order Completed | WooCommerce only. Fires once when the order status transitions to Completed. For digital-goods stores this typically means the download is delivered; for physical-goods stores it usually means the order is marked fulfilled and closed. |
| Order Shipped | WooCommerce only. Fires when the order acquires a shipped-like status (wc-shipped or shipped) or when the first shipment tracking information is added to a shippable order. Ideal for post-ship follow-up and delivery confirmation journeys. |
The trigger selector only shows triggers that match your connected store. No store → only contact and email triggers. Shopify only → WooCommerce-specific triggers are hidden. WooCommerce only → Shopify-only triggers are hidden. If a trigger is visible but grayed out, your store is connected but Email CRM is not enabled — go to Account → Ecommerce to enable it. See Connect Shopify or Connect WooCommerce.
The trigger type is fixed at journey creation time and cannot be changed afterward. Contact and email triggers (Contact Added, Tag Added, Email Opened, Email Clicked) work without any store connection.
Journey Builder
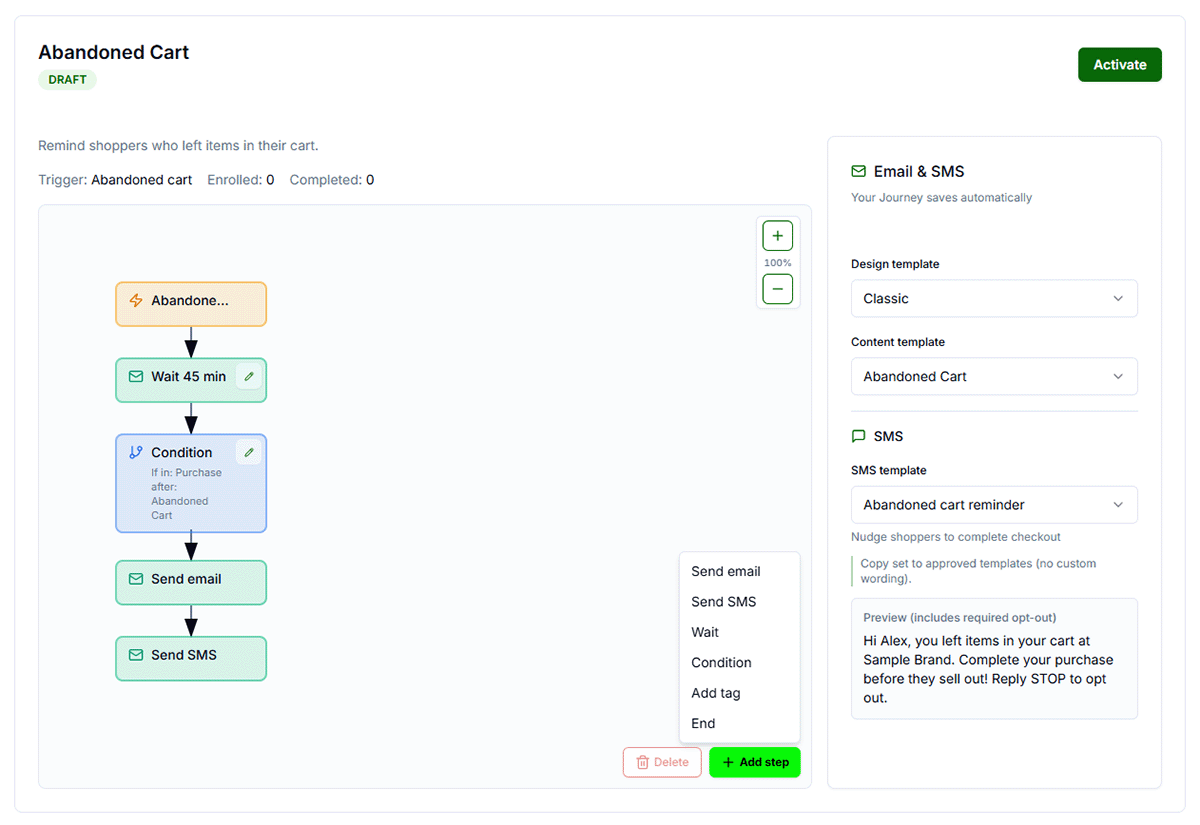
The Journey Builder is split into two panels: the canvas on the left (the visual flow) and the Step Editor Panel on the right (where you configure individual steps like which Design Template to use for an email).
Step Types
Steps are the nodes you add to the canvas to build your automation. Each type has a different purpose and configuration method.
Send Email
Sends an email to the enrolled contact at this point in the flow. This is the most common step type.
- Click the node on the canvas to open its configuration in the Step Editor Panel on the right.
- Set the Subject, Preheader, and email body using the same rich text editor as Campaigns.
- Apply a Design Template (the visual frame — logo, colors, fonts) and a Content Template (pre-written copy layout) from the panel.
- Personalize with merge tags:
{{firstName}},{{orderNumber}},{{cartUrl}}, and more.
Consecutive sends are blocked: Two Send email steps cannot appear back-to-back without a Wait step between them. The canvas will prevent this insertion to protect your contacts from receiving emails too rapidly.
Wait
Pauses a contact's progress through the journey for a set amount of time before advancing them to the next step.
- When you add a Wait step, a dialog appears to set the duration.
- Minutes: choose 5, 10, 15, 30, or 45 minutes.
- Hours: enter any number from 1 to 18.
- Days: enter any number from 1 to 30.
To edit an existing Wait node, click it to select it, then click the edit control on the node to re-open the dialog.
Abandoned Cart journeys include an automatic 45-minute Wait before the email.
When you create a new Abandoned Cart journey, the canvas is pre-built with a 45-minute Wait step before the first Send email. Shopify's checkout-update webhook fires on every checkout interaction (email entered, address typed, etc.) — not only on actual abandonment — so this delay gives the buyer a chance to finish their purchase naturally before being emailed an abandoned-cart message. You can edit or remove the Wait before activating, but we recommend keeping at least 30–45 minutes of pre-email delay.
Condition
Splits the flow into two branches — True and False — based on a rule evaluated against the contact at the moment they reach this step.
The Condition dialog offers three modes:
| Mode | What it evaluates |
|---|---|
| Contact Rules | Match the contact against one or more field rules — status, tags, custom properties, last emailed date, and more. Combine multiple rules with AND or OR logic. |
| Segment Membership | Check whether the Contact is currently a member of a specific Segment. |
| Enrollment Context | Evaluate data from the trigger event itself — e.g., whether the triggering event included an order ID or a cart URL (useful for abandoned cart flows). |
Both the True and False branches must be completed with an End step before you can activate the journey.
Add Tag
Applies a tag to the contact's record when they pass through this step. Tags can be used to segment contacts, trigger other journeys, or track funnel progress.
- Enter the tag name in the dialog — use lowercase with hyphens for consistency (e.g.,
post-purchase,vip). - If the contact already has the tag, it is skipped without error.
- Tags added here are visible on the contact record and searchable in segment filters.
Send SMS
Sends an SMS message to the contact. This step only appears in the Add step menu when SMS is enabled for your account.
- Configure the SMS message content in the Step Editor Panel on the right.
- Contacts without a verified phone number automatically skip this step — the journey continues without failing.
- Delivery respects TCPA opt-out rules, quiet hours based on the recipient's area code, and state-level frequency limits.
SMS must be set up before it can be used in journeys. See SMS setup.
End
Marks the contact's enrollment as complete and stops their progression through the journey.
- Every path through the journey — including both branches of every Condition — must end with an End node.
- A journey can have multiple End nodes (one per branch).
- End nodes have no configuration.
Adding & Connecting Steps
Steps are added using the Add step button in the bottom-right corner of the canvas. The position of the new step depends on what is currently selected.
Appending a Step at the End
- Click an empty area of the canvas to make sure nothing is selected.
- Click Add step and choose a step type.
- The new step is added below the last node in the flow and automatically connected with an arrow.
Inserting a Step Between Existing Steps
- Click a node on the canvas to select it — it highlights with a ring.
- Click Add step and choose a step type.
- The new step is inserted after the selected node. The connection from the selected node to its previous downstream step is automatically preserved.
Tip: Use insert mode to add a Wait before an existing Send email step, or to add a Condition after a trigger without rebuilding the whole flow. Select the node you want to insert after, then click Add step.
Editing & Deleting Steps
Editing a Step
Click any node on the canvas to select it. What happens next depends on the step type:
| Step Type | How to configure |
|---|---|
| Send Email | Click the node → Step Editor Panel on the right loads the email editor |
| Send SMS | Click the node → Step Editor Panel on the right loads the SMS configuration |
| Wait | Click the node, then use the edit control on the node to reopen the Wait dialog |
| Condition | Click the node, then use the edit control on the node to reopen the Condition dialog |
| Add Tag | Click the node, then use the edit control on the node to reopen the Tag dialog |
| End | No configuration — click to select, then delete if needed |
Deleting a Step
- Click a node to select it.
- Click the Delete button in the bottom-right canvas overlay, or press Backspace or Delete.
- The step is removed and any upstream/downstream steps are automatically reconnected.
The Trigger node cannot be deleted. The Delete button is disabled when the trigger is selected.
Canvas Controls
Zoom
The zoom controls appear in the top-right corner of the canvas:
- + — zoom in (increases by 15% per click, max 200%)
- N% — click the percentage label to reset to 100%
- − — zoom out (decreases by 15% per click, min 25%)
The canvas automatically adjusts the column layout as you zoom — zooming out may wrap a long vertical flow into multiple side-by-side columns so everything stays visible without excessive vertical scrolling.
Dragging Nodes
Click and hold any node, then drag it to reposition it on the canvas. The connecting arrows (edges) update automatically to follow the new positions. The canvas may re-adjust positions after a zoom or window resize as part of its automatic layout pass.
Scrolling
The canvas scrolls both horizontally and vertically when the flow extends beyond the visible area. Use standard scroll gestures (mouse wheel, trackpad, or touch) to pan.
Activating & Pausing
To Activate a Journey
- Build your full flow on the canvas — every branch must end with an End step.
- Configure all Send email and Send SMS steps using the Step Editor Panel.
- Make sure your Email Sender is configured with a physical mailing address (required for CAN-SPAM compliance).
- Click Activate in the Journey header — the status changes to Active.
- The canvas becomes read-only and the Journey starts enrolling contacts whenever the trigger fires.
To Pause a Journey
- Click Pause in the Journey header — the status changes to Paused.
- The canvas becomes editable again.
- Contacts already enrolled continue moving through the flow — pausing does not stop in-progress enrollments.
- New contacts will not be enrolled until you re-activate.
Making changes to a live Journey: Pause → edit the canvas → re-activate. There is no way to edit the canvas while a Journey is Active. This is intentional — it prevents changes from disrupting contacts who are currently mid-flow.
Troubleshooting
| Issue | Solution |
|---|---|
| Canvas is not editable — I can't add or delete steps | The Journey is Active. Click Pause in the header to make the canvas editable. |
| "Add step" shows an error and doesn't insert the step | You may be trying to add two Send email steps back-to-back. Add a Wait step between them first. |
| Activate button is disabled or shows a sender error | Configure your email sender with a physical mailing address in Email → Sender Settings. |
| Send SMS is not showing in the Add step menu | SMS is not enabled for your account. See SMS setup to enable it. |
| Node positions jump after I add a step | Expected behavior — the canvas auto-adjusts positions after mutations to keep the flow readable. Drag nodes to your preferred positions after editing. |
| Journey is not enrolling new contacts after activation | Check that the trigger condition is actually firing — for e-commerce triggers, confirm your store is connected. For list-based triggers, confirm contacts are being added to the correct list. |
| Step Editor Panel does not update when I click a node | Click directly on the node shape (not on the edge/arrow). If the panel still does not update, refresh the page. |
| Canvas appears blank | Refresh the page. The Trigger node is created automatically — if it is missing, a reload will re-create it. |
Next steps
- Automated CRM Journeys — overview of Journeys, triggers, and the Journeys list page
- Email Editor — full guide to the email editor used in Send email steps
- Email Design Templates — create branded visual themes for your Journey emails
- Email Content Templates — build reusable body copy layouts for Journey email steps
- SMS Setup — enable SMS steps in your Journeys
- Contacts & Segments — manage the contacts and segments used in Journey conditions
- Email & SMS Analytics — monitor Journey enrollments and step completion rates